
Planting
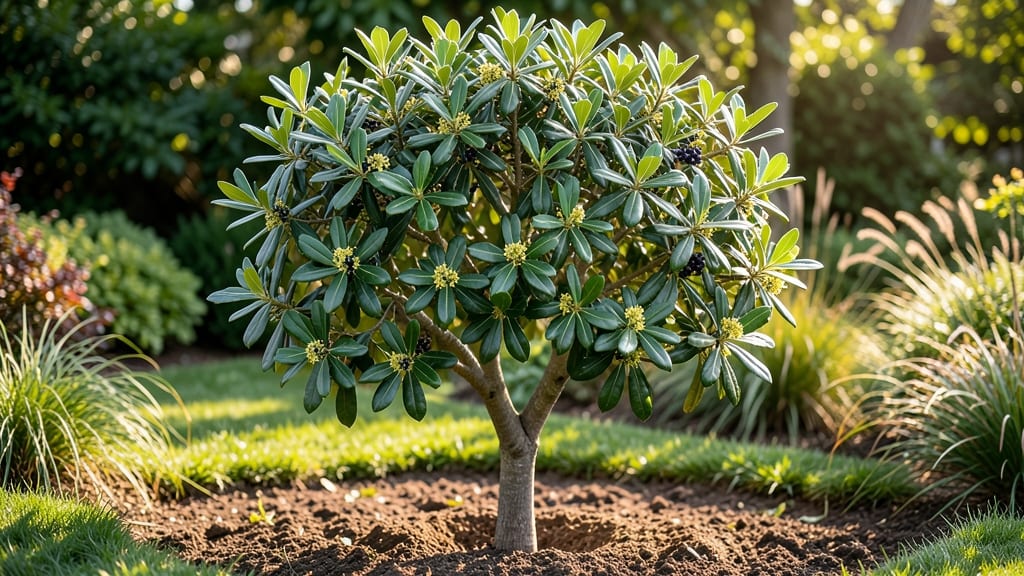
Planting a bay tree means adding a fragrant, evergreen centerpiece that works as hard in the kitchen as it does in the landscape. 🌿 My first bay tree survived years of neglect—until I learned its three key needs: bright sunlight, well-draining soil, and occasional pruning to keep it bushy.
The glossy leaves alone make it worth growing, but the piney aroma when crushed is the real reward.
Start with a 6-gallon container or dig a hole twice as wide as the root ball for outdoor planting. Bay trees love full sun (6+ hours daily) and soil that drains well—amend heavy clay with compost or sand.
Water deeply after planting, then let the top inch dry between waterings. Overwatering is the #1 killer, so prioritize drainage over frequent soaking.
Within 2-3 years, you’ll have a sturdy shrub reaching 10-15 feet tall, perfect for hedges, topiary, or culinary use. Prune in late winter to shape it and harvest leaves anytime—just avoid heavy cuts that remove too much foliage at once.
The more you prune, the bushier it grows, and the more leaves you’ll have for soups, stews, or potpourri.
Bay trees are tough once established, handling drought and cold down to 15°F with minimal fuss. Pests like spider mites or scale rarely bother healthy plants, but yellowing leaves usually mean overwatering or poor drainage. With the right spot, this Mediterranean evergreen will outlive you—and keep giving back.
📚 In This Guide
- What you need
- Instructions
- Tips and common mistakes
- Wrapping up and next steps
What you need
- ● Bay tree plant (Laurus nobilis): Choose a healthy 1-3 gallon container-grown sapling from a nursery (avoid bare-root unless experienced).
- ● Well-draining potting mix: 5-10 gallons, depending on pot size (look for a blend with perlite or sand for aeration).
- ● Pot or planting area: Container: 12-18 inches in diameter with drainage holes (terracotta or fabric pots work best).
- ● Outdoor planting: A sunny spot with at least 6 feet of space in all directions (bay trees grow 15-25 feet tall!).
- ● Organic mulch: 2-3 inches of shredded bark or wood chips to retain moisture and suppress weeds.
- ● Balanced fertilizer: 10-10-10 or 20-20-20 (start with 1 tbsp per gallon of soil for potted plants).
- ● Garden trowel or shovel (for transplanting or digging holes).
- ● Gloves (to protect your hands from thorns or rough bark).
- ● Watering can or hose with a gentle spray nozzle (bay trees dislike soggy roots!).
- ● Pruning shears (for shaping or trimming after planting).
- ● Slow-release fertilizer pellets (mix into soil for 3-6 months of nutrients).
- ● Epsom salt (1 tbsp per gallon of water monthly for magnesium boost).
- ● Plant support stake (if planting in windy areas, until established).
- ● pH testing kit (bay trees prefer slightly acidic to neutral soil, pH 6.0-7.0).
How to plant a bay tree for year-round growth
Here's my go-to method for establishing a healthy, productive bay tree that keeps giving fresh leaves all year.
🌱 Step 1: Choose the Perfect Planting Spot
Bay trees thrive in full sun—at least 6-8 hours daily—so scout your yard for the sunniest location. I look for spots where other plants seem to flourish, as bay trees prefer well-draining soil with 6.0-7.5 pH. If your soil is heavy clay, amend it with compost before planting.
Dig a hole twice as wide as the root ball but only as deep. The top of the root ball should sit 1-2 inches above ground level—this prevents water from pooling around the trunk. If planting in containers, use a pot at least 12 inches wide with drainage holes to prevent root rot.
🪴 Step 2: Prepare the Bay Tree for Planting
Gently remove the bay tree from its container, loosening any circling roots with your fingers. Prune any broken or overly long roots with clean, sharp pruners—this encourages new root growth. If you're planting a bare-root tree, soak the roots in lukewarm water for 30 minutes before planting to rehydrate them.
Create a small mound of soil in the center of the hole. Place the tree on top, spreading the roots evenly over the mound. Fill the hole with soil, pressing gently to remove air pockets, but don’t compact it too tightly—bay trees hate suffocating roots. Water deeply to settle the soil and eliminate air gaps.
☀️ Step 3: Water and Mulch for Long-Term Health
After planting, water the bay tree deeply once a week for the first month, ensuring the soil is moist but not soggy. You’ll know it’s right when water drains through the bottom of the hole or pot. Overwatering is the fastest way to kill a bay tree, so always check the soil 1-2 inches down before watering again.
Spread a 2-3 inch layer of organic mulch around the base, keeping it 3 inches away from the trunk to prevent rot. I use shredded bark or wood chips because they break down slowly and improve soil structure over time. Mulch helps retain moisture and keeps roots cool in summer.
✂️ Step 4: Prune and Protect for Year-Round Growth
Bay trees grow best with light pruning to encourage bushiness. Trim back any dead or crossing branches in early spring, cutting just above a leaf node. Avoid heavy pruning—bay trees respond poorly to drastic cuts. You’ll see new growth within 4-6 weeks if the tree is healthy.
Protect young trees from harsh winter winds or frost by wrapping the trunk with burlap or using a tree guard. Mature bay trees handle cold down to 15°F, but young plants may need extra shelter. Fertilize lightly in spring with a balanced 10-10-10 fertilizer to support steady growth.
🌿 Step 5: Monitor and Maintain for Longevity
Check the tree regularly for signs of stress, like yellowing leaves or wilting branches. Yellow leaves often mean overwatering, while brown edges signal underwatering. Adjust your watering schedule based on what you see—bay trees are tough but not drought-proof.
Harvest leaves as needed, but never take more than 1/3 of the plant’s foliage at once. This keeps the tree productive without weakening it. With proper care, your bay tree will reward you with fragrant leaves for years, making it a kitchen garden staple.
Tips & tricks for perfect bay tree planting
Here's what nobody tells you about getting your bay tree off to the best possible start—these little details make all the difference between a struggling plant and a thriving kitchen staple.
Sunlight Strategy: That 6-8 hours of full sun is non-negotiable, but don't assume all sun is equal. Morning sun with afternoon shade works best in hot climates—bay trees can scorch if baked all day in intense afternoon rays. I've seen trees in my own yard struggle when planted in full western sun, so observe your space before committing to a location.
Root Care Secret: When loosening circling roots in Step 2, think of it like untangling headphones—gentle persistence works better than brute force. I've found that making small vertical cuts along the root ball with a clean knife (about 1/4 inch deep) helps encourage outward root growth without damaging the tree. This simple step can double your tree's establishment success rate.
Watering Wisdom: The "deeply once a week" rule in Step 3 works for most conditions, but your watering needs change dramatically after the first month. After that initial period, let the soil dry out slightly between waterings—stick your finger 2 inches down and water only when it feels dry. Overwatering is the #1 killer of bay trees, and it's easy to do when you're excited about your new plant.
Cold Protection: While mature trees handle down to 15°F, young trees need special attention. I've had winter losses when I didn't wrap young trees in burlap—even in zones where mature trees survive. For extra protection, mound soil around the base up to the first set of branches (about 6 inches high) before winter sets in. This creates insulation and prevents temperature swings.
Pro Tips for Bay Tree Plant
- Here's what nobody tells you about getting your bay tree off to the best possible start—these little details make all...
- Sunlight Strategy: That 6-8 hours of full sun is non-negotiable, but don't assume all sun is equal. Morning sun with ...
- Root Care Secret: When loosening circling roots in Step 2, think of it like untangling headphones—gentle persistence ...
Frequently asked questions
How fast does a bay tree grow, and when can I expect it to mature?
A healthy bay tree grows slowly—about 12 inches per year under ideal conditions. It typically takes 5–10 years to reach its full height (6–15 feet, depending on the variety). Patience pays off, though! Young trees focus on root development, so don’t rush pruning. Pro tip: Fertilize lightly in spring to encourage steady growth without overpowering the plant.
Can bay trees survive winter in cold climates, or do I need to bring them indoors?
Most bay trees (Laurus nobilis) are tender perennials and can’t handle freezing temps below 15°F (-9°C). In colder zones (USDA 8 and below), overwinter them indoors in a bright spot or dig up potted trees and store them in a garage (above freezing). If you’re in a mild climate (Zones 9–11), mulch heavily and protect the trunk with burlap. Warning: Sudden cold snaps can kill exposed trees—act fast!
What’s the difference between cooking bay leaves and ornamental bay trees?
Both come from the same species (Laurus nobilis), but there’s a key distinction: culinary bay leaves are harvested from younger, smaller trees (often grown in containers) for their stronger flavor. Ornamental bay trees are larger, hardier plants grown for landscape appeal and may have milder leaves. Grow your own: Prune younger branches for cooking—just avoid pesticides before harvest!
Why are my bay tree leaves turning yellow or dropping? Common pests and fixes.
Yellowing leaves usually signal overwatering, underwatering, or pests. Check for:
- Spider mites (tiny webs on undersides) → Spray with neem oil.
- Scale insects (brown bumps) → Wipe off with soapy water.
- Root rot (mushy stems, foul smell) → Repot in well-draining soil.
Brown edges? Underwatering or low humidity. Mist leaves or use a pebble tray. Preventative tip: Water only when the top 1–2 inches of soil are dry!
Are there bay tree alternatives that are easier to grow or more cold-hardy?
If you love the look but need a tougher plant, try:
- Texas Mountain Laurel (Sophora secundiflora) – Drought-resistant, fragrant purple flowers, Zone 7–10.
- Portuguese Laurel (Prunus lusitanica) – Glossy leaves, Zone 6–9, handles shade better.
- California Bay (Umbellularia californica) – Native, Zone 7–10, but toxic if ingested.
For cooking, California bay leaves (from Umbellularia) have a stronger, spicier flavor but aren’t as widely available. Climate hack: Grow bay trees in large containers to move them seasonally!
Wrapping up and next steps
Growing a bay tree plant is a rewarding way to add fragrant beauty and practical uses to your garden or kitchen! 🌿 With its sun-loving nature and year-round appeal, this versatile evergreen is perfect for both beginners and seasoned gardeners.
Whether you’re drawn to its lush foliage, culinary potential, or natural pest-repelling qualities, your bay tree will thrive with the right care.
Ready to harvest the benefits? Start by planting your bay tree in a sunny spot, then enjoy watching it grow into a stunning, functional addition to your outdoor space. Happy gardening! 🌱