
Pruning
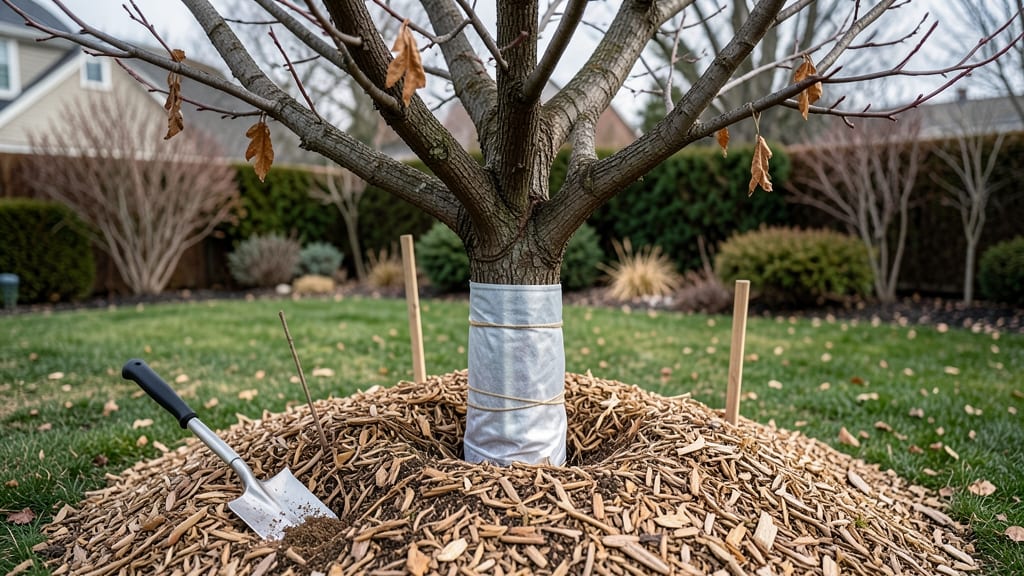
Young fruit trees need winter protection to survive their first cold snaps. 🌳 I’ve learned the hard way that skipping this step means cracked bark, winter burn, or even death—don’t let that happen to yours.
The key is wrapping trunks properly, mulching correctly, and knowing when to prune for resilience against frost. Most gardeners overdo it with mulch or use the wrong materials, which can actually harm the tree.
A 3-inch layer of organic mulch around the base is ideal, paired with a breathable tree wrap (like burlap or commercial frost cloth) to shield the trunk. This combo keeps roots warm while preventing moisture buildup that leads to rot.
By spring, your trees will emerge with smooth, unscarred bark and stronger roots. The right technique makes all the difference—especially for young saplings still establishing themselves. Even mature trees benefit from a little extra care during harsh winters.
Avoid common mistakes like wrapping too tightly (which restricts growth) or using plastic wraps (which trap moisture). Instead, focus on breathable materials and proper spacing. With these steps, your fruit trees will thrive year after year.
📚 In This Guide
- What you need
- Instructions
- Tips and common mistakes
- Wrapping up and next steps
What you need
- ● Burlap or frost cloth: 10–20 ft per tree (depending on size; opt for breathable 1.5–2 oz/yd² fabric).
- ● Tree wrap or paper: 1–2 rolls (e.g., Kraft paper or plastic tree wrap—avoid direct contact with bark).
- ● Mulch: Organic: 2–4 inches of straw, wood chips, or shredded leaves (avoid fresh wood chips near the trunk).
- ● Inorganic: Pine needles or gravel (for better drainage in wet climates).
- ● Stakes or branches: 4–6 per tree (for securing wraps or creating a windbreak).
- ● Twine or zip ties: 1–2 rolls (for securing materials without damaging bark).
- ● Pruners: 1 pair (for trimming dead or weak branches before wrapping).
- ● Garden hose or spray bottle: (for wetting wraps if using frost cloth).
- ● Anti-desiccant spray: (e.g., Wilt-Pruf) to prevent moisture loss in evergreens.
- ● Reflective bubble wrap: For extra insulation in extreme cold zones (layer over frost cloth).
- ● Mini greenhouses or cloches: For tender young trees (e.g., citrus or figs).
- ● Thermometer: Soil or air (to monitor temperatures if you’re really committed!).
- ● Compost or manure: A small bag to boost soil fertility after winter.
How to protect young fruit trees through winter
Here’s my go-to method for shielding tender saplings from harsh cold—tested on peach, cherry, and apple trees.
❄️ Step 1: Wrap the Trunk with Tree Guard
Start by applying a 2-inch wide tree guard (or burlap) around the trunk, leaving the base uncovered to prevent moisture buildup. I overlap the strips by 1 inch and secure them with plastic tree ties—this creates a snug barrier that blocks cold winds while allowing airflow. For extra insulation, add a second layer of bubble wrap over the guard, ensuring it’s snug but not tight enough to restrict growth.
Stop wrapping 6 inches above the graft union (if applicable) to prevent rot. If your tree has a thin trunk, wrap it twice—once horizontally, once vertically—for added protection. This double layer is especially critical for newly planted trees with delicate bark.
🪴 Step 2: Build a Protective Barrier Around the Base
Pile 4-6 inches of mulch (straw or wood chips) around the tree, keeping it 3-4 inches away from the trunk to avoid suffocating roots. I like to mound the mulch into a low cone shape—this helps snow and rain drain away while insulating the soil. For extra cold snaps, add a 3-inch layer of leaves or pine needles over the mulch to lock in warmth.
If your area gets heavy snow, create a low wooden frame around the tree (about 1 foot wide) and fill it with mulch. This prevents the trunk from being buried, which can cause rot. Check the mulch every few weeks—if it compacts, fluff it up to maintain airflow.
❄️ Step 3: Add a Snow Shield for Heavy Snowfall
In regions with deep snow, I install a flexible wire hoop (like a small garden arch) over the tree and drape burlap or frost cloth loosely over it. This prevents snow from accumulating on branches, which can snap under weight. Secure the fabric with clips or stakes, but leave the top open so sunlight can still reach the tree.
For trees under 10 feet tall, a single hoop works. For taller saplings, add a second hoop midway up the trunk to support heavier snow loads. Remove the shield in early spring before buds swell—trapped moisture can promote fungal growth.
🌱 Step 4: Monitor and Adjust Through the Season
Check your tree every 2-3 weeks for signs of stress, like cracked bark or mold under the wrap. If you see condensation or dampness, unwrap the tree briefly to air it out. I also watch for rodent activity—if mice chew through the wrap, replace it with wire mesh before rewrapping.
Adjust mulch levels after heavy rains—too much moisture can suffocate roots. If winter thaws occur, remove snow from branches immediately to avoid ice damage. By late winter, start gradually uncovering the tree as daytime temperatures rise above 40°F to harden it off.
Tips & tricks for fruit tree winter protection
Took me years of trial and error to perfect these tricks—here's how to keep your young trees thriving through even the harshest winters.
Material Selection: For Step 1, I recommend using burlap over tree guard when possible—it breathes better and resists moisture better than plastic. The key is finding materials that balance insulation with airflow; I've seen plastic wraps trap too much condensation, leading to rot. If using bubble wrap, opt for the clear, double-bubble type—it traps more air than single-bubble varieties. For trees in windy areas, add a third layer of landscape fabric outside the bubble wrap to block wind while allowing some airflow.
Mulch Depth Matters: In Step 2, that 4-6 inch mulch layer is critical but needs proper placement. I've learned the hard way that piling mulch directly against the trunk causes rot—always maintain that 3-4 inch gap. For extra insulation during extreme cold snaps, I sometimes add a 1-inch layer of straw on top of the mulch cone to create an additional insulating barrier. This extra layer helps maintain consistent soil temperatures during temperature swings.
Snow Shield Placement: When installing the snow shield in Step 3, position the wire hoops slightly higher than your tree's current height—branches will grow during winter. I've seen many gardeners make this mistake and end up with branches pressing against the fabric, which can cause breakage. For trees over 10 feet tall, consider using PVC pipes instead of wire hoops—they're more durable and won't sag under heavy snow. Always leave that 6-inch opening at the top to prevent moisture buildup.
Monitoring System: For Step 4, I've created a simple monitoring schedule: check trees every 2 weeks on mild winter days (above 30°F) and every week during extreme cold snaps. Use a small flashlight to inspect for condensation or mold—early detection prevents major issues. I keep a small notebook by my front door to record inspection dates and any issues noted, which helps track seasonal patterns in my garden.
Pro Tips for Fruit Tree Winter Protection
- Took me years of trial and error to perfect these tricks—here's how to keep your young trees thriving through even th...
- Material Selection: For Step 1, I recommend using burlap over tree guard when possible—it breathes better and resists...
- Mulch Depth Matters: In Step 2, that 4-6 inch mulch layer is critical but needs proper placement. I've learned the ha...
Frequently asked questions
Got questions about keeping your fruit trees cozy this winter? You’re not alone! Here are some of the most common concerns—and straightforward answers—to help you protect your young saplings like a pro.
What’s the best time to wrap fruit trees for winter?
Wrap trees after the first hard frost but before temperatures drop below 20°F (-6°C). This timing prevents early stress from fluctuating temps while shielding them from extreme cold. For tender varieties (like peaches or citrus), wait until nighttime lows are consistently below freezing. Pro tip: Use a thermometer to track local conditions!
Can I reuse wrapping materials from last year?
Yes, but only if they’re in good condition. Inspect for tears, mold, or rodent damage before reuse. Disinfect with a 10% bleach solution (1 part bleach to 9 parts water) if storing long-term. Avoid plastic wraps—opt for breathable fabrics like burlap or frost cloth to prevent moisture buildup, which can harm bark.
How do I protect young fruit trees from rodents and pests?
Rodents love gnawing on tree bark—especially in winter! Wrap trunks with hardware cloth (mesh size < ¼ inch) before adding insulation. Sprinkle dried blood meal or peppermint oil around the base as a natural deterrent. For severe infestations, consider tree guards (plastic or metal sleeves) to create a physical barrier.
What if my tree is already wrapped, but the bark looks damaged?
Don’t panic! Gently unroll the wrap and inspect the bark. If you see sunburned (gray/brown) or cracked areas, apply a thin layer of tree wound pruning sealant to protect exposed wood. Avoid over-wrapping— leave 1–2 inches of trunk uncovered near the base to prevent suffocation. Rewrap loosely with breathable material.
Are there alternatives to traditional tree wraps for small gardens?
For compact spaces, try:
- Straw mulch: Pile 6–12 inches around the base (but keep it away from the trunk to avoid rot).
- Cardboard tubes: Cut open and wrap snugly around the trunk, secured with twine.
- Living mulch: Plant cold-hardy ground covers (like clover) near the tree to insulate roots naturally.
For extra warmth, add a layer of bubble wrap inside fabric wraps—it traps air without restricting airflow.
Wrapping up and next steps
Protecting your young fruit trees from winter’s chill isn’t just about survival—it’s about setting them up for a bountiful future! 🌱 With the right wrapping techniques, cold-resistant materials, and a little TLC, you’ll give your saplings the best shot at thriving come spring.
Now that you’re armed with the know-how, roll up your sleeves and get ready to shield those tender branches—your future harvest depends on it!
💡 Next step: Gather your supplies, pick a calm day, and start wrapping before the first frost hits. Your trees (and your future fruit!) will thank you.